Quick Fill Instructions
At the top of the Form area, you will find a blue "Quick Fill Options" box. Quick Fill can be used to populate Corporate Addresses pre-loaded by your Worth Higgins Account Manager, or saved data that you have entered in any versioned or variable template. It's not necessary to use this feature, however it can save re-keying time and improve accuracy. The following information will be helpful if you need to create, revise, or delete Quick Fills.
Quick Fill Options
- Quick Fill options are found in the blue Quick Fill Options box at the top of the Form area.
This feature can be used to populate Corporate Addresses pre-loaded by your Worth Higgins Account Manager, or Saved Quick Fills which is saved data that you have entered in any versioned or variable template.
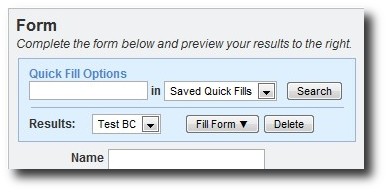
- First step is to click on the Menu Options, which has Saved Quick Fills as the default value.
- For Corporate Addresses, pick that option from the menu then click Search. From the Results menu pick the address you want and click Fill Form.
- For Saved Quick Fills, pick that option from the menu then click Search. From the Results menu pick the saved data you want and click Fill Form. The next heading will explain how to create Saved Quick Fills.
To Create a Quick Fill:
- Fill out the form fields as you normally would. If you want to use the Corporate Addresses Quick Fill feature first, that's fine, but always do it before you manually fill in personal information.
- Once you've completed the form, proofed the contents and are satisfied, enter a name for your Quick Fill using the blue "Save Form for Quick Fill:" box at the bottom.
- Naming Tips — Since your saved Quick Fills will be available in the menu throughout the site regardless of which template you're using, it's critical that you use a naming convention that not only makes sense to you, but also identifies the template. For example, for a business card template you might use "My BC", or if you have business cards printed for a special event, include that information in the name, like "Phoenix Show BC". Follow that pattern when saving all personal Quick Fills so you can easily find the one you need when working with individual templates.
- Once you've entered a name, click the Save button and your new Quick Fill will now be in the "Saved Quick Fills" menu at the top.
To Revise a Quick Fill:
- To revise a saved Quick Fill, simply open it and make the revision(s) in the form fields, then enter the same name you've already used at the bottom. When you click the "Save" button, that Quick Fill will be overwritten with the new data.
To Delete a Quick Fill:
- To delete a Quick Fill, activate it by clicking on it from the menu, then click on the "Delete" button. The deleted Quick Fill will be removed from the menu at the top.